Are you planning to give your home a fresh look with new flooring? Vinyl floor tiles could be the perfect choice for you.
They’re affordable, durable, and come in a variety of designs that can transform any room into a stylish space. But how do you install these tiles without making it feel like a daunting task? Don’t worry, because you’re about to discover a simple, step-by-step guide that will make the installation process a breeze.
Imagine the satisfaction of walking into a room and seeing the stunning results of your hard work. It’s easier than you think, and by following these straightforward instructions, you’ll soon be enjoying your new floors with pride. Dive into the article to unlock the secrets of vinyl floor tile installation, and take the first step towards your home’s transformation.
Choosing Vinyl Floor Tiles
Vinyl tiles come in many types. Peel-and-stick tiles are easy to use. Glue-down tiles need more work. Luxury vinyl tiles look like real wood. Printed vinyl tiles have patterns. Solid vinyl tiles are strong. Each type has its own look and feel. Pick the one that suits your room.
Vinyl tiles are very strong. They last a long time. They are easy to clean. Water cannot hurt them. Vinyl tiles are soft to walk on. They are less costly than other floors. They can look like wood or stone. Many colors and styles are available.

Gathering Necessary Tools
Before starting, gather all the essential tools. You will need a tape measure to check the room size. A utility knife is important for cutting tiles. Use a straight edge for making straight cuts. Adhesive is necessary to keep tiles in place. Finally, a notched trowel will help spread the adhesive evenly.
For more precise work, consider optional tools. A tile cutter can help with straight, clean cuts. Use a roller to press tiles down firmly. A chalk line helps with layout accuracy. Safety goggles will protect your eyes during cutting. These tools make work easier, but are not always required.
Preparing The Subfloor
Dirt and dust can cause problems. Sweep the floor to remove them. Vacuum for a deeper clean. Mop with warm water and mild soap. Let the floor dry completely. Stains and sticky spots must be removed. Use a gentle cleaner for tough stains. Avoid harsh chemicals. Ensure no residue is left behind. A clean subfloor helps the tiles stick better.
Uneven floors can cause tiles to crack. Check for bumps or dips. Use a level tool. Fill dips with leveling compound. Sand down any bumps. Ensure the surface is smooth. Repeat the check with the level tool. A flat surface is crucial for tile stability. Remember to follow the compound instructions. Wait for it to dry before moving on.
/can-you-tile-over-vinyl-floor-1822596-b0f2e6dd19854b2c830bab9193af728d.png)
Planning The Layout
Measure the room carefully. Use a tape measure. Write down the length and width. This helps in buying the right amount of tiles. Accuracy is important here. Don’t forget small corners. Measure these too. Double-check your numbers. Mistakes can cost money. Precision saves time and effort.
Decide where tiles will go. Start in the center. Work your way out. This makes the design look nice. Symmetry is key for beauty. Plan the pattern before starting. Use chalk to mark spots. This helps in seeing the layout. Visualize the final look. Adjust if needed. A good plan makes the job easier.
Cutting Vinyl Tiles
Use a sharp utility knife for cutting vinyl tiles. Make sure the blade is new. Place the tile on a flat, hard surface. Measure the area you need to cut. Mark it with a pencil or chalk. Hold the tile steady with one hand. Gently score along the line with the knife. Apply light pressure at first. Go over the line several times. The tile will become easier to snap.
Accurate cuts make tiles fit well. Always use a ruler or straightedge. This helps keep your line straight. Double-check your measurements. Mistakes can waste material. Work slowly and carefully. This saves time and avoids errors. Practice on scrap pieces first. This builds confidence and skill. Proper technique ensures a smooth finish.
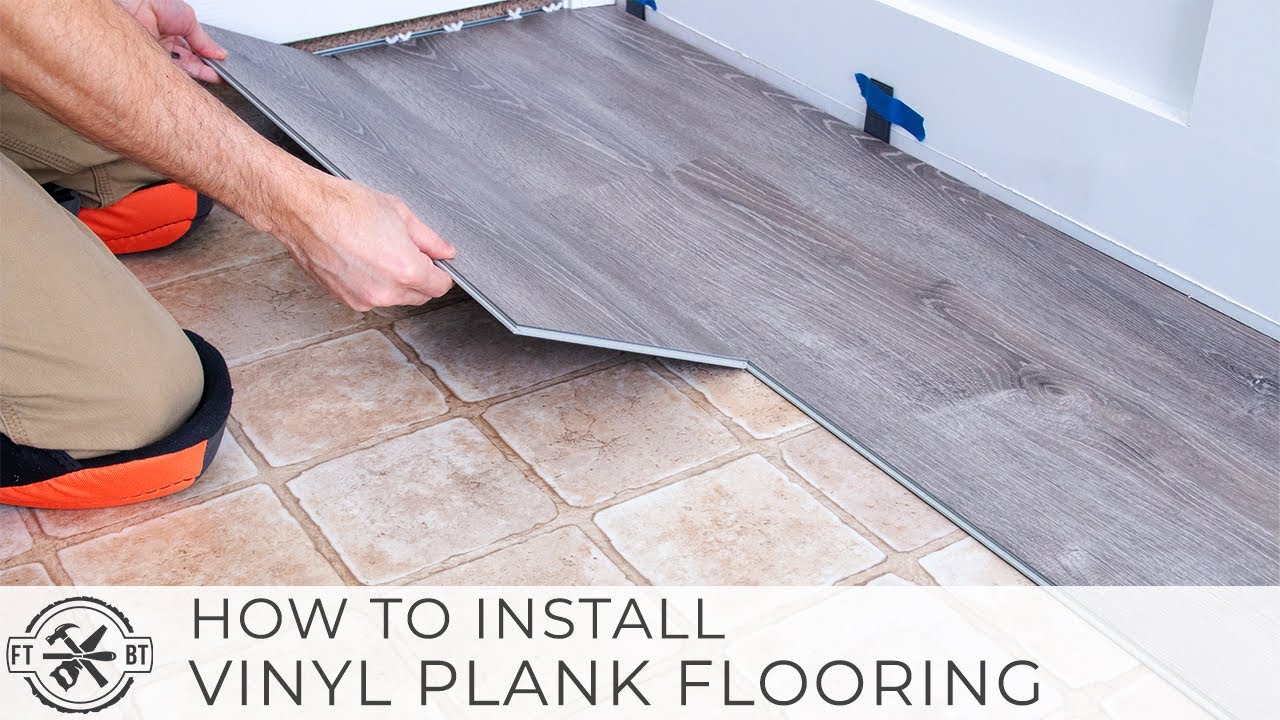
Installing The Tiles
This method is very easy. First, clean the floor well. Make sure it is dry. Next, peel off the paper from the tile. Then, stick the tile on the floor. Press it firmly to hold it in place. Repeat with each tile. Align tiles properly to avoid gaps. Use a roller for smoothness.
Start by spreading glue on the floor. Use a trowel for even spread. Place the tile gently on the glue. Press down to fix it. Continue placing tiles next to each other. Ensure no gaps between them. Let the glue dry fully before walking on it. This will make the floor last longer.
Finishing Touches
Trimming excess edges is important for a neat finish. Use a sharp utility knife for clean cuts. Carefully trim any overhanging tiles. Hold the knife steady and cut slowly. This helps avoid mistakes. Make sure all edges are smooth. This gives a professional look.
After trimming, check for any leftover pieces. Remove them gently. This ensures the floor looks tidy. A straight edge can guide your cuts. It helps keep lines even. Always work safely and watch your fingers.
Next, focus on sealing the seams. Use a recommended seam sealer. This keeps water and dirt out. Apply the sealer along the tile edges. Press down gently for a good seal. Let it dry completely. This step protects your floor. It makes cleaning easier and extends the floor’s life.

Maintaining Vinyl Floors
Vinyl floors need regular cleaning to stay nice. Use a soft broom to sweep dirt away. A damp mop with warm water works well. Avoid using too much water. Water can damage the floor. Mild soap is okay, but not often. Too much soap can make floors sticky.
Vinegar and water can clean too. Mix them and mop. Don’t use abrasive scrubbers. They can scratch the floor. Keep your vinyl floors clean and they will last longer.
Protect your vinyl floors from heavy furniture. Use furniture pads under legs. This stops scratches. Doormats help keep dirt out. Place them by doors. Keep high heels off the floor. They can make dents.
Sunlight can fade vinyl. Use curtains to block it. Move rugs often. This stops color fading. Keep your vinyl floor safe and it will stay pretty.
Frequently Asked Questions
What Tools Do You Need For Installation?
To install vinyl floor tiles, you’ll need a utility knife, measuring tape, adhesive, and a roller. These tools ensure precise cutting, secure adhesion, and smooth application. A clean surface is essential, so a broom or vacuum is recommended to prepare the area before installation.
Can You Install Vinyl Tiles Over Concrete?
Yes, you can install vinyl tiles over concrete. Ensure the concrete is clean, dry, and level for best results. Any cracks or imperfections should be repaired. Use a suitable adhesive to secure the tiles. Proper preparation helps achieve a durable, long-lasting finish.
How Do You Cut Vinyl Floor Tiles?
Cut vinyl floor tiles using a utility knife for precision. Measure and mark the cutting line first. Score the tile gently, then apply more pressure to complete the cut. Always ensure the blade is sharp for clean edges. This method helps achieve accurate fitting around obstacles.
Do You Need Underlayment For Vinyl Tiles?
Underlayment isn’t always necessary for vinyl tiles, but it can enhance comfort and sound insulation. If the existing floor is uneven, underlayment helps achieve a smoother finish. Check the manufacturer’s recommendations for specific requirements. Proper installation ensures the tiles adhere well and perform effectively.
Conclusion
Vinyl floor tiles are easy to install. With the right tools, you can transform your space. Remember to measure your area carefully. Clean the floor before starting. Use adhesive for strong hold. Press tiles firmly to avoid gaps. Cut tiles for perfect fit around edges.
Check your work frequently. Keep extra tiles for future repairs. Enjoy your new floor look. Vinyl tiles offer durability and style. Transform your room with simple steps. Happy flooring!


