
Are you ready to transform your space with the timeless elegance of engineered flooring? Imagine walking into a room where the floor exudes sophistication and warmth, instantly elevating the ambiance of your home.
Engineered flooring offers a perfect blend of style, durability, and easy maintenance, making it a popular choice for homeowners like you. But before you can revel in the beauty of your new floors, there’s one crucial step—installation. You might be wondering, “How can I install engineered flooring without a hassle?
” Whether you’re a DIY enthusiast or someone seeking a straightforward guide, mastering the installation process is within your reach. This guide is designed to empower you with clear, simple steps, turning what might seem like a daunting task into a rewarding project. By following these instructions, you’ll not only achieve a professional-looking finish but also enjoy the satisfaction of having done it yourself. Dive into this article and discover the secrets to a flawless installation, ensuring your floors not only look stunning but also stand the test of time. Let’s get started on creating a space you’ll love to show off!
Benefits Of Engineered Flooring
Engineered flooring is strong and lasts long. It handles moisture better than wood. This makes it perfect for kitchens. The top layer is real wood, giving a natural look. It’s easy to install. You can do it yourself. The layers make it stable. It won’t warp easily. Cleaning is simple. A mop and broom do the job. Many styles and colors are available. You can pick what suits your home. It’s a cost-effective choice. You get quality for less money.
It can be installed over many surfaces. Concrete and old floors are fine. The installation process is quick. It saves time and effort. These floors are great for busy homes. Kids and pets are no problem. Scratches and dents are rare. With proper care, it stays beautiful. It’s a smart investment for any home.
Tools And Materials Needed
Start with a tape measure. It helps you measure the room. You need a saw to cut the planks. Make sure it’s sharp. Have a hammer handy. It helps in fitting the planks. A level is crucial. It ensures the floor is even. Use a flooring nailer. It makes the job easier.
Don’t forget the adhesive. This keeps the planks in place. Underlayment is also important. It provides a smooth surface. Keep safety goggles on. Protect your eyes at all times. Knee pads are useful too. They keep your knees safe. Gather these items before starting.
Preparing The Subfloor
Start by cleaning the subfloor. Remove all dirt and dust. Use a broom or a vacuum cleaner. Make sure the surface is clear. Check for any bumps or holes. Use a level to see if it’s flat. If you find bumps, sand them down. Fill holes with wood filler. Let it dry. Ensure it’s smooth before moving on.
Moisture can damage your new floor. Use a moisture meter for testing. Check different spots on the subfloor. If the reading is high, wait for it to dry. Use a dehumidifier if needed. Ensure the subfloor is dry before laying the flooring. This step is crucial to avoid future problems.
Choosing The Right Underlayment
Underlayment is very important for engineered flooring. It helps in reducing noise. It also adds comfort underfoot. Choose an underlayment that suits your needs. Foam is a popular choice. It is soft and easy to install. Cork is another option. It is natural and eco-friendly. Rubber underlayment provides excellent sound insulation. Each type has its own benefits. Consider the moisture level of your room. Some underlayments are better for wet areas. Thickness matters too. Thicker underlayment adds more cushion. Check the compatibility with your flooring. Not all underlayments fit all floors. Choose wisely.
Acclimating The Flooring
Engineered flooring needs time to adjust. Bring the flooring inside your home. Let it sit for at least 48 hours. This helps the wood get used to room temperature. It also adjusts to the room’s humidity. Make sure the packages are not stacked too high.
Keep them in the room where you will install. Keep the room temperature steady. Around 65 to 75 degrees Fahrenheit is best. Also, keep the humidity between 35% and 55%. This is important for the wood’s stability. If you don’t, it might warp or bend later.
Open the boxes a little. Let the air flow in. This helps the wood breathe. It will help the flooring last longer. Always follow the manufacturer’s instructions too.
Planning The Layout
First, grab a tape measure. Measure the length and width of the room. Write down the numbers. Multiply length by width to get the area. This helps in buying the right amount of flooring. Make sure to add 10% extra for cuts and waste.
Think about how you want the floor to look. There are different patterns to choose. Straight, diagonal, and herringbone are popular. Straight is simple. Diagonal makes a room look bigger. Herringbone is fancy. Choose the one you like best.
Cutting The Flooring
Always wear safety goggles to protect your eyes. Keep your hands away from the saw blade. Hold the saw firmly. This helps to cut straight.
Use a ruler to mark where to cut. This ensures the wood fits well. Cut slowly to avoid mistakes. Take your time for a good finish.
Keep the floor area clean. Remove all tools and debris. Slip and fall accidents can happen. Wear protective gloves for hand safety.
Make sure the saw is in good condition. Check for any damage. A faulty saw can be dangerous. Ensure proper lighting while working. This helps to see clearly.
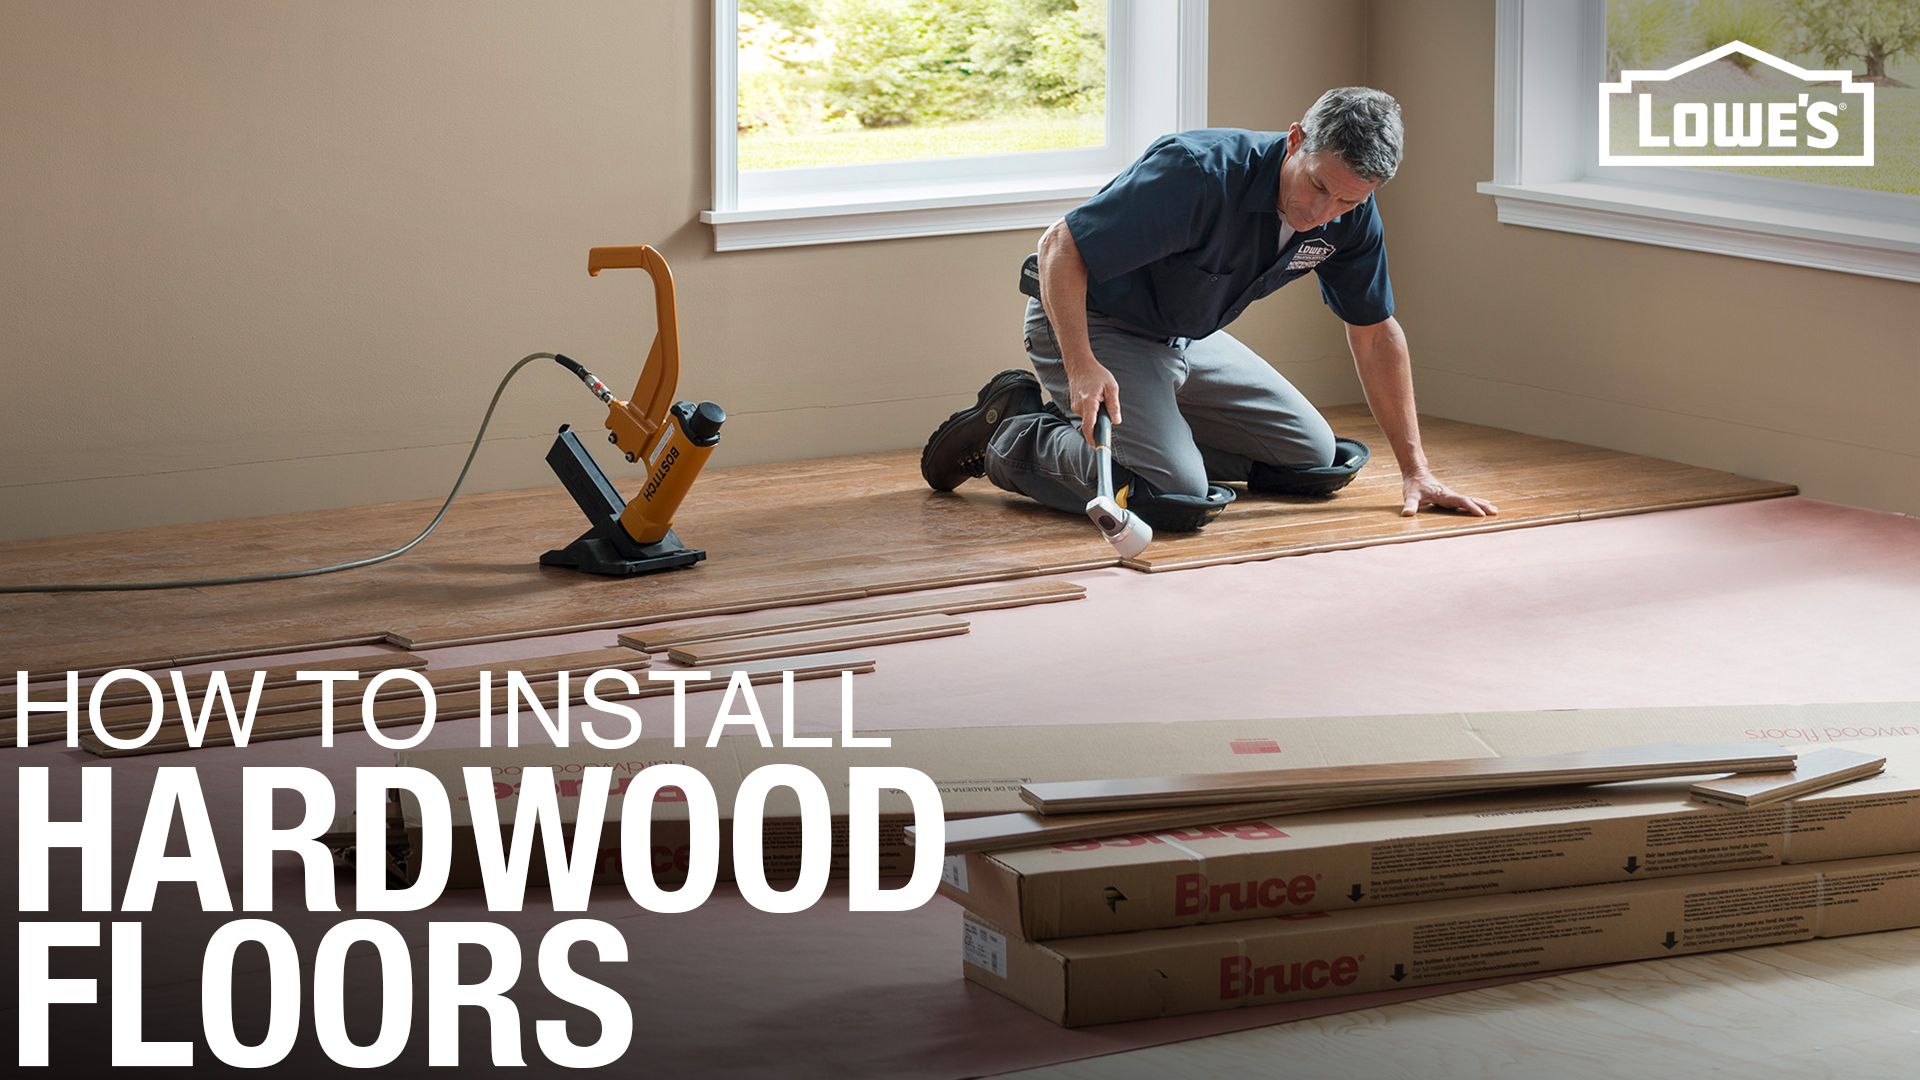
Installing The First Row
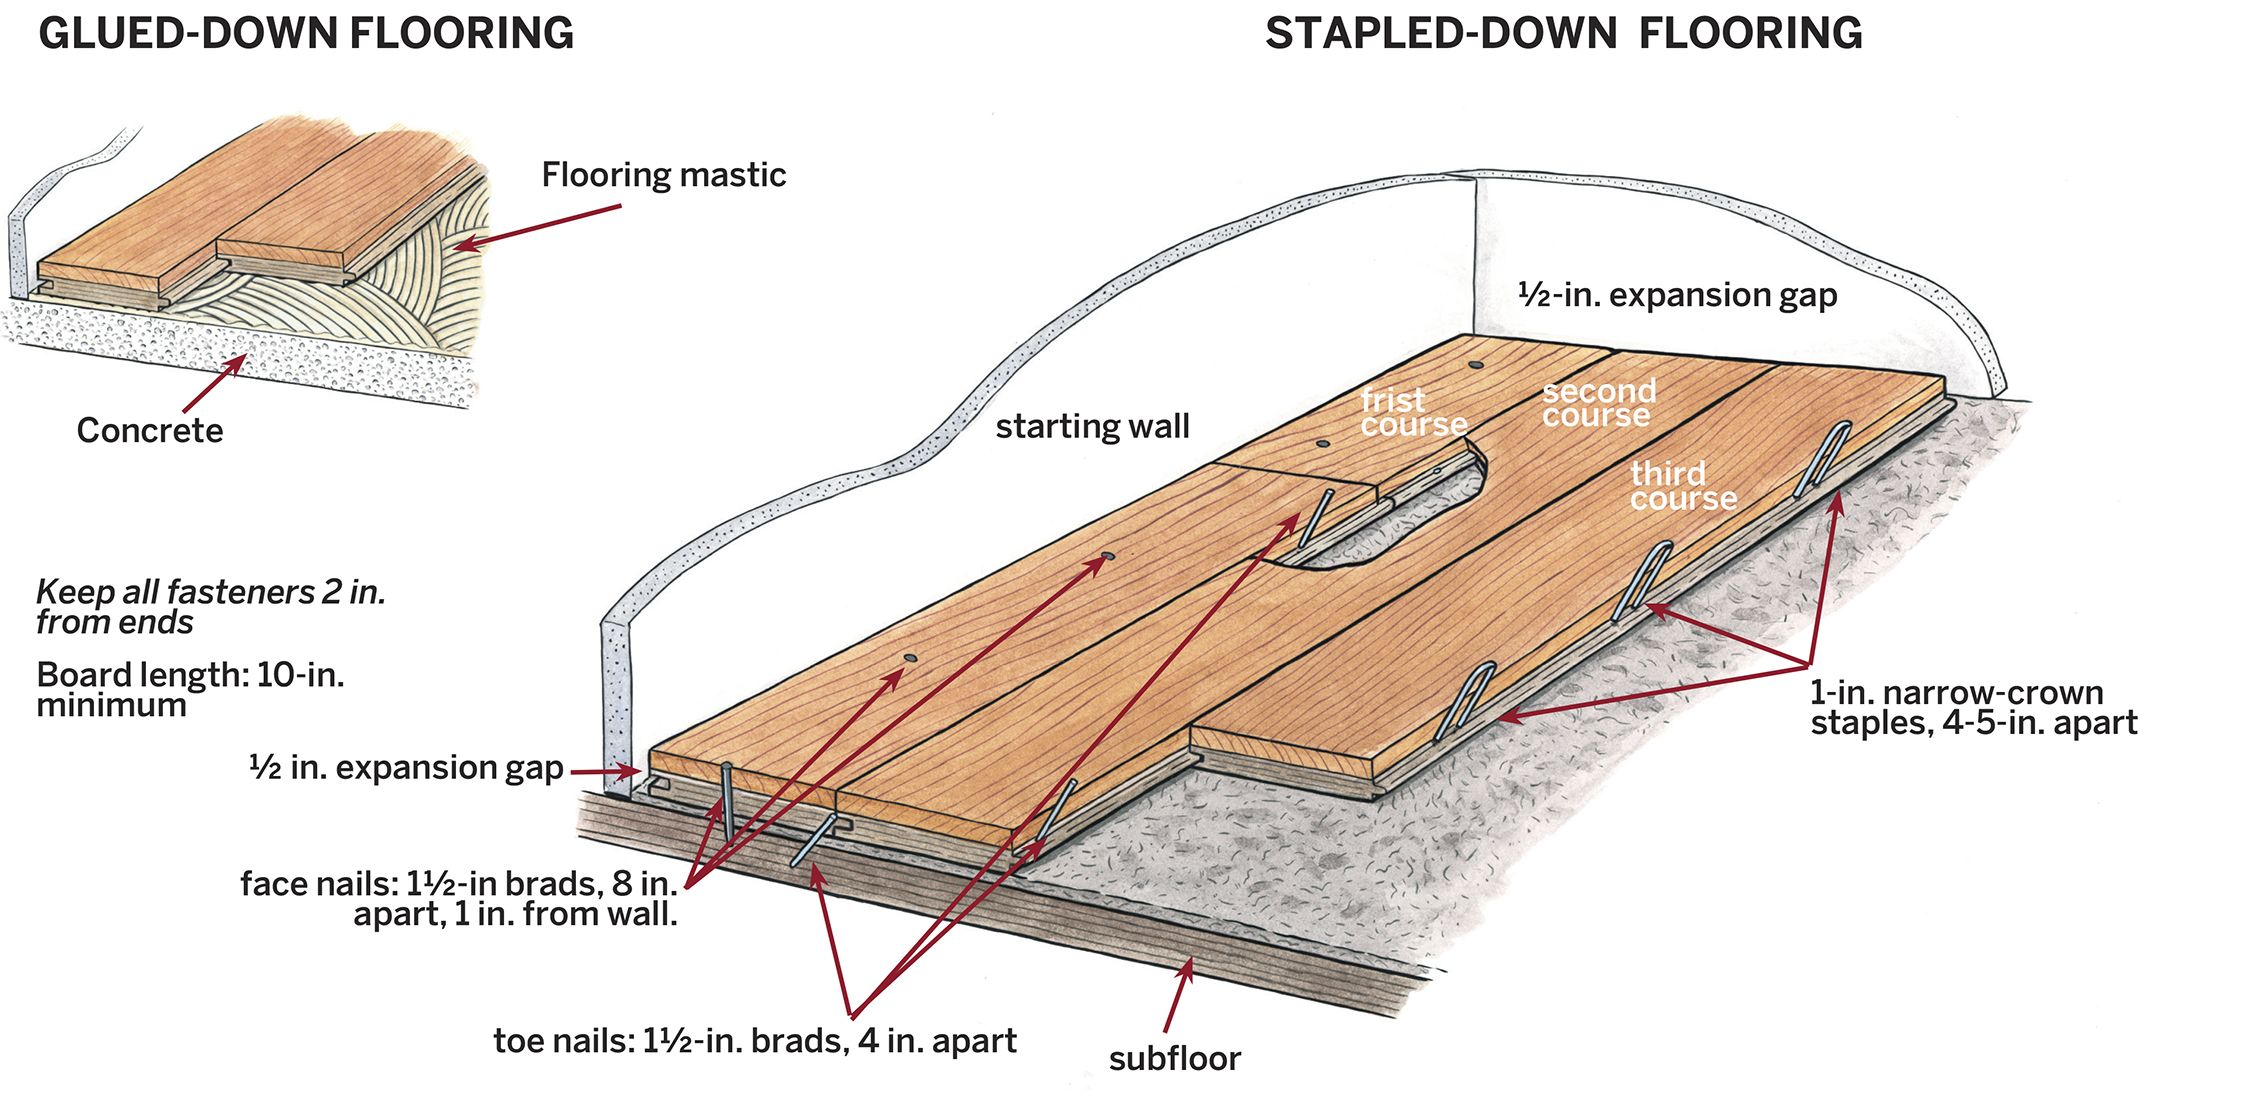
Aligning the Boards is key to a good floor. Start at the longest wall. Place the first board. Use a spacer for gaps. These gaps help with board swelling. Check if the board is straight. If not, adjust carefully. Make sure each board lines up. Gaps must stay even.
Securing the Boards ensures they stay put. Use a nail gun or hammer. Nails hold the boards tight. Place nails at board edges. This keeps the floor steady. Check each board after nailing. If a board moves, fix it. A stable floor is important.
Continuing The Installation
Continue laying the engineered flooring by aligning the planks with precision. Use a tapping block to secure each piece firmly. Ensure proper spacing with spacers for expansion. This method ensures a seamless and durable floor finish.
Staggering The Boards
Stagger the boards to make the floor strong. Place each board so it overlaps with the one next to it. This helps stop the floor from breaking. Use different lengths for the boards. This makes a nice pattern. Avoid lining up the ends of boards. This makes the floor look neat.
Checking For Gaps
Check for gaps between boards. Gaps can make the floor weak. Use a spacer to measure the space between boards. Make sure the boards are close together. If you find a gap, adjust the boards. Push them closer together. This will make the floor look better.
Installing The Final Row
The last boards can be tricky to fit. Measure the space carefully. Trim the boards if needed. Leave a small gap for expansion. Use a pull bar to fit the boards snugly. Check that the boards are even and aligned. Adjust if necessary. A mallet can help tap them into place. Be gentle to avoid damage.
Once the boards are in, inspect the floor. Look for gaps or uneven spots. Use a transition strip to cover gaps. Secure the strip with nails or glue. Clean the floor to remove dust and debris. Admire your new flooring. It’s now ready for use. Enjoy your updated room!
Post-installation Care
Proper post-installation care ensures the longevity of engineered flooring. Clean spills quickly to prevent damage. Use soft brooms and damp mops for routine cleaning.
Cleaning The Floor
Keep your engineered floor looking new with regular cleaning. Start by sweeping or vacuuming to remove dirt and dust. Use a soft broom or a vacuum with a soft brush attachment. Avoid using a wet mop. Instead, use a damp cloth for spots. Water can damage the floor. Use a cleaner made for wood if needed. Dry the floor with a soft cloth after cleaning.
Maintenance Tips
- Place mats at doorways to catch dirt.
- Use felt pads under furniture legs.
- Keep pet nails trimmed to prevent scratches.
- Avoid dragging heavy objects across the floor.
- Control humidity levels to protect the floor.
- Check for spills and clean them quickly.
Following these tips will help your floor last longer. A little care goes a long way.

Frequently Asked Questions
What Tools Are Needed For Installation?
For installing engineered flooring, you’ll need a tape measure, saw, hammer, and spacers. Additionally, a tapping block and pull bar are essential. Ensure you have a moisture meter and adhesive suitable for your flooring type. Proper tools ensure a smooth installation process and help avoid mistakes.
Can Engineered Flooring Be Installed On Concrete?
Yes, engineered flooring can be installed on concrete. Ensure the concrete is clean and level before installation. Use a moisture barrier to prevent any potential issues. Floating installation or glue-down method works well on concrete. Always follow the manufacturer’s guidelines for the best results.
How Long Does Installation Take?
The installation time for engineered flooring varies based on room size and layout. Typically, a professional can complete it in one to three days. Preparation, such as acclimating the flooring, can add extra time. DIY installations may take longer, depending on experience and tools.
Is Acclimation Necessary Before Installation?
Yes, acclimation is crucial before installing engineered flooring. It helps the flooring adjust to room temperature and humidity. Typically, 48-72 hours in the installation area is recommended. Proper acclimation prevents warping and ensures a stable fit. Always follow specific guidelines provided by the flooring manufacturer.
Conclusion
You’ve learned how to install engineered flooring step-by-step. This process enhances the beauty of your home. Remember to measure twice before cutting. Clean the area thoroughly before starting. Use quality tools and materials for best results. Patience is key for a smooth installation.
Don’t rush; take your time and do it right. Check for level floors to avoid issues later. Follow these tips, and your floors will look fantastic. Enjoy your new, stylish engineered flooring. Now, you can admire your hard work and skillful craftsmanship.


