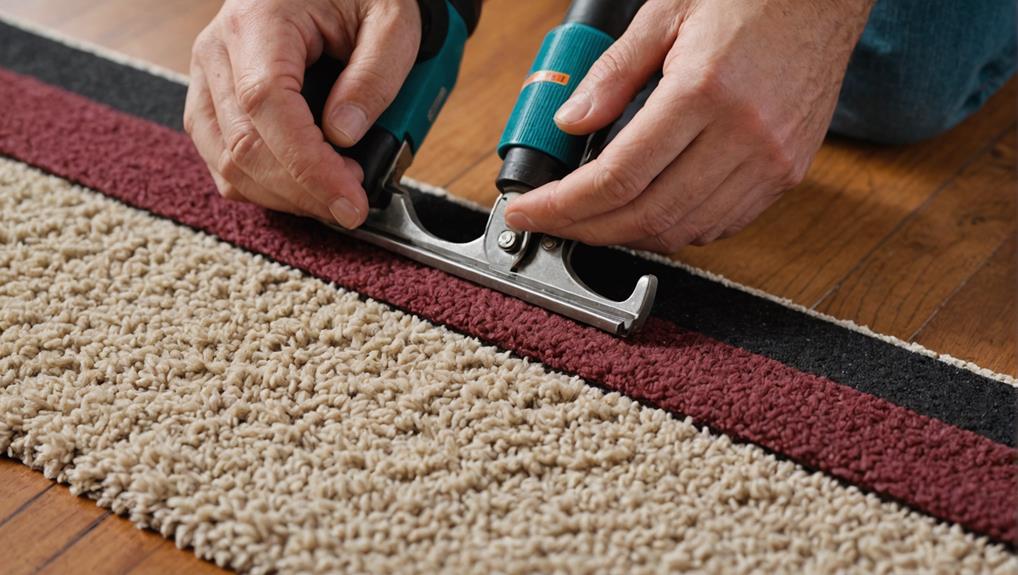
To fix seams in carpet flooring, start by preparing the area: clear furniture and clean the surface. Use a utility knife to trim any frayed edges for a clean cut. Apply the appropriate adhesive, guaranteeing even coverage. A carpet seaming iron can melt hot melt tape for strong bonds, while a seam roller guarantees tight adhesion. Check the seam alignment and tension to avoid misalignments. Finally, conduct a thorough inspection for gaps or discoloration. Properly sealing the seams enhances durability and appearance. For further tips on guaranteeing your carpet looks its best, you can explore additional techniques.
Understanding Carpet Seams
Understanding carpet seams is key for guaranteeing a seamless and professional-looking installation. When you're working with carpet, it's important to recognize the various seam types available, as each serves different purposes and demands specific techniques. The most common seam types include butt seams, which are created by placing two edges of carpet together without overlapping, and overlap seams, where one edge is folded over the other. Properly choosing the seam type can greatly affect the overall appearance and function of your flooring.
Seam durability is another critical factor to take into account. A well-constructed seam not only enhances the aesthetic appeal but also contributes to the longevity of the installation. You'll want to make sure that the seams are reinforced adequately to withstand foot traffic and wear over time. Using appropriate seam tape and adhesive can help secure the edges and maintain their integrity.
When installing carpet, it's also important to pay attention to the carpet grain direction. Aligning the seams with the grain will minimize visibility and enhance the overall look. Additionally, making sure that the seam edges are cut cleanly and precisely will prevent fraying, which can compromise durability.
Lastly, always adhere to safety practices while working with carpet seams. Proper ventilation is necessary when using adhesives, and wearing protective gear, like gloves and masks, can help minimize exposure to harmful chemicals. By understanding these fundamental aspects of carpet seams, you'll be better equipped to achieve a professional and lasting installation.
Tools Needed for Repair
What tools do you need to effectively repair seams in carpet flooring? Having the right tools is essential for guaranteeing a successful and safe repair. Below is a list of essential items you should gather before starting your project:
| Tool | Purpose |
|---|---|
| Carpet Seaming Iron | Melts adhesive for seam types like hot melt tape |
| Seam Roller | Presses down the seam, guaranteeing a tight bond |
| Utility Knife | Cuts carpet pieces to fit, guaranteeing clean edges |
| Carpet Adhesive | Various adhesive options for different seam types |
| Measuring Tape | Guarantees precise measurements for accurate cuts |
When it comes to seam types, you might encounter options like butt seams or overlap seams, each requiring specific techniques and tools. For adhesive options, some common choices include hot melt tape or liquid adhesives, depending on the material of your carpet and the environment in which it's laid.
Before you begin, always prioritize safety. Wear gloves when handling the utility knife and adhesive, and guarantee that your workspace is clear of any tripping hazards. Familiarize yourself with each tool's function, as proper usage will not only enhance your repair quality but also minimize the risk of injury. With the right tools and knowledge, you can achieve a professional-looking seam repair that enhances the durability and appearance of your carpet flooring.
Preparing the Area
To start, clear the work area of any furniture or obstacles to guarantee you have ample space to maneuver. Next, gather all necessary tools, including a seam roller, adhesive, and a utility knife, to streamline the repair process. Finally, inspect the carpet seams carefully for any damage or lifting that needs attention before you begin the repair.
Clear the Work Area
Before diving into seam repairs, it's important to clear the work area to guarantee a smooth and efficient process. A clean workspace not only enhances your focus but also minimizes safety hazards. Start by removing any furniture or obstacles that might impede your movement. This will give you ample room to maneuver and prevent accidental tripping.
Next, focus on cleaning debris that could affect your repairs. Dust, dirt, or leftover carpet fibers need to be swept away. Not only does this promote a cleaner working environment, but it also guarantees that your seams adhere properly during repairs.
As you prepare, consider these key steps:
- Remove all furniture from the area to avoid damage.
- Sweep and vacuum the floor to eliminate dust and debris.
- Organize tools nearby for easy access when you need them.
- Check for any hazards like loose wires or uneven surfaces.
Gather Necessary Tools
Having the right tools on hand is essential for a successful carpet seam repair. The tools you gather will depend on the seam types and the adhesive options you choose. Proper preparation not only enhances the quality of your repair but also guarantees your safety throughout the process.
Here's a quick reference table to help you organize your tools:
| Tool | Purpose |
|---|---|
| Carpet Knife | For cutting the carpet and seam edges |
| Seam Tape | To bond the carpet seams securely |
| Iron | For activating adhesive in heat-sensitive options |
| Trowel | To apply adhesives evenly |
| Measuring Tape | To measure carpet lengths and seam gaps |
Make sure you've got everything ready before you start. Using the right tools will minimize risks, like accidental cuts or uneven seams. Always prioritize safety by wearing gloves and protective eyewear when handling sharp tools. This approach allows you to focus on achieving a seamless and durable repair, regardless of the seam types or adhesive options involved.
Inspect Carpet Seams
Inspecting the carpet seams is an essential step in preparing the area for repair. By carefully evaluating the seams, you can identify any weaknesses that could compromise seam durability and aesthetics. Start by thoroughly examining the seams for signs of wear, such as fraying or gaps. This will guarantee you address all issues effectively.
Here are some key points to focus on during your inspection:
- Check for visible gaps: Look for spaces where the carpet edges don't align properly, as these can lead to further damage.
- Assess seam integrity: Tug gently at the seams to test their strength; loose seams may require immediate attention.
- Look for discoloration: Fading or stains can detract from seam aesthetics, so identify areas that may need cleaning or patching.
- Evaluate the carpet material: Confirm the carpet fibers are consistent across seams to maintain a uniform appearance.
Re-aligning the Seams
When it comes to re-aligning the seams in carpet flooring, a careful approach is vital to guarantee a seamless appearance. Begin by evaluating the current seam alignment. Verify both edges of the carpet pieces meet precisely; misalignment can cause noticeable gaps or overlaps. You'll want to check the carpet tension as well. If the carpet is too loose, it may lead to further misalignment; if it's too tight, it could cause the seams to buckle.
To re-align the seams effectively, start by gently lifting the edges of the carpet where they meet. Use a carpet knife to trim any frayed or excess fibers that might be causing unevenness. This step is critical; uneven edges will prevent proper alignment.
Once you've prepared the edges, lay them back down, confirming they are flush against one another. Use a seam roller to press the seams together, helping to maintain proper seam alignment. This tool not only helps flatten the seams but also guarantees that the carpet fibers are interwoven correctly, contributing to a more cohesive look.
As you work, maintain an eye on the overall carpet tension. Adjust the tension by pulling the carpet slightly, if necessary, to achieve an even surface. Remember, a well-aligned seam not only enhances aesthetics but also contributes to the longevity of your carpet. Take your time with each step to guarantee a secure and professional-looking finish.
Applying Adhesive Properly
Applying adhesive properly is vital for guaranteeing a strong bond between carpet seams. Choosing the right adhesive type is significant; options include latex, hot melt, and pressure-sensitive adhesives. Each type offers unique benefits, so consider the specific requirements of your project.
When applying adhesive, follow these application techniques to achieve the best results:
- Clean the Surface: Confirm the seam area is free from dust, dirt, and debris. A clean surface promotes better adhesion.
- Use a Consistent Application Method: Whether you're using a roller, trowel, or spray, maintain a consistent technique to apply an even layer of adhesive. Uneven application can lead to weak spots.
- Follow Manufacturer Guidelines: Always adhere to the instructions provided by the adhesive manufacturer. This includes drying times and recommended quantities.
- Control the Environment: Temperature and humidity can affect adhesive performance. Ideally, work in a controlled environment to guarantee ideal bonding conditions.
Once you've applied the adhesive, confirm the seams are pressed firmly together. This helps eliminate air pockets and enhances adhesion. Avoid disturbing the seams until the adhesive has fully cured, as this can compromise the bond. Remember, a well-adhered seam not only improves the appearance of your carpet but also extends its lifespan. By following the proper techniques and safety precautions, you'll achieve a professional finish that stands the test of time.
Using a Seam Roller
To guarantee a seamless finish in your carpet installation, using a seam roller is vital for pressing down the edges of the carpet where the seams meet. This tool assures that the adhesive bonds effectively, which is essential for durability and a professional appearance. The seam roller benefits include improved adhesion, reduced risk of bubbles, and a more aesthetically pleasing seam.
When using a seam roller, start by confirming the seams are aligned correctly and the adhesive has been applied properly. Then, place the seam roller at the seam's edge and roll it toward the center. Use consistent pressure while rolling to confirm that the carpet fibers are properly compressed against the adhesive. This technique aids in eliminating air pockets, which can compromise the integrity of the seam.
It's also important to use the seam roller in different directions. Rolling from both sides of the seam toward the center can further enhance adhesion. Make sure to keep the roller clean, as debris can affect the quality of the seal. Additionally, for safety reasons, always wear gloves to protect your hands and avoid direct contact with the adhesive.
Lastly, take your time. Rushing through this step may lead to visible seams or weak bonds. By mastering these seam roller techniques, you'll not only enhance the longevity of your carpet but also guarantee a clean, professional-looking installation that you can be proud of.
Finishing Touches
Once you've secured the seams, it's essential to apply seam sealing techniques to prevent fraying and enhance durability. You'll also need to guarantee the colors match seamlessly for a polished appearance, so consider using swatches for accurate comparisons. Finally, run through a final inspection checklist to confirm that everything meets your quality standards before considering the job complete.
Seam Sealing Techniques
Three effective seam sealing techniques can guarantee your carpet flooring looks seamless and polished. You'll want to focus on maintaining seam integrity and using the right adhesive types for the best results. Here are four key techniques to take into account:
- Heat Welding: This involves melting a thermoplastic adhesive to bond seams, providing strong seam integrity while minimizing visible joints.
- Double-Sided Tape: Utilizing high-quality double-sided tape allows for quick application and effective adhesion without compromising safety.
- Liquid Adhesive Application: Carefully apply a liquid adhesive to the seam edges. This method guarantees thorough coverage and enhances durability.
- Seam Sealant: A seam sealant can be applied over the seams to prevent fraying and protect against moisture, further enhancing the longevity of your carpet.
Whichever technique you choose, make sure you follow safety guidelines. Proper ventilation is essential when using adhesives, and wearing gloves can help protect your skin. By carefully selecting your methods and materials, you'll not only enhance the aesthetic of your carpet but also make certain its durability and safety for years to come.
Color Matching Tips
Achieving a cohesive look in your carpet installation often hinges on effective color matching. To guarantee your seams blend seamlessly, start by evaluating the existing carpet's color and texture. Pay close attention to any color fading that may have occurred due to sunlight or wear. This can affect how new sections will appear alongside older pieces.
When selecting replacement pieces, consider using dye matching techniques. If you have remnants from the original installation, bring them along to the store. This will help you find a color that closely resembles the existing carpet. If you're unable to find an exact match, some manufacturers offer custom dye services that can create a color more aligned with your needs.
Additionally, it's crucial to check the lighting in the installation area. Natural light can greatly alter how colors appear, so evaluate your carpet under various lighting conditions to prevent mismatches. Finally, always test small samples in the actual installation area before making any permanent decisions. By following these steps, you'll enhance the overall appearance of your carpet and guarantee a safe, visually pleasing environment in your home.
Final Inspection Checklist
A thorough final inspection is essential for guaranteeing your carpet installation meets your standards and expectations. This step not only assesses the aesthetics but also confirms the longevity and safety of your flooring. Focus on the following critical areas:
- Seam Durability: Check all seams for strength and neatness. Any visible gaps or fraying could compromise the carpet's lifespan.
- Alignment and Stretch: Verify the carpet is aligned properly and not bulging or wrinkling. Proper stretching is necessary for both safety and appearance.
- Surface Integrity: Inspect the carpet for any snags, stains, or inconsistencies. Addressing these issues now can prevent future carpet maintenance challenges.
- Transition Areas: Examine the transitions between different flooring types. They should be smooth to minimize tripping hazards.
Completing this inspection will guarantee your carpet not only looks great but also functions effectively. Remember, a well-installed carpet enhances both safety and comfort in your space, while also reducing the likelihood of future maintenance problems. Don't rush this process; it's the final touch that can make all the difference in your carpet's performance and durability.
Frequently Asked Questions
How Can I Prevent Future Carpet Seam Issues?
To prevent future issues, focus on seam maintenance tips and proper carpet installation techniques. Guarantee the subfloor is clean and dry before installation, as moisture can weaken seams. Use high-quality adhesive and follow manufacturer guidelines for seam placement. Regularly inspect seams for signs of wear and tear, and address any loose edges immediately. Keeping humidity levels stable in your home can also help maintain the integrity of your carpet seams over time.
Is Professional Help Necessary for Seam Repairs?
Did you know that nearly 30% of DIY carpet repairs end up requiring professional help? When it comes to seam repairs, using proper techniques is essential for durability and safety. While some may feel confident tackling it themselves, professional carpet services can guarantee that the seam is not only visually appealing but also securely bonded, reducing the risk of future issues. If you want peace of mind, it's often worth investing in expert assistance.
What Types of Carpets Are Easiest to Seam Repair?
When considering seam repairs, cut pile carpets are often easier due to their straightforward tufting, allowing for seamless blending. Loop pile carpets, including Berber, can pose challenges because of their intricate designs, but with careful attention, they can be managed. Carpet tiles are a practical option as they're designed for easy replacement and repair. Always guarantee you've the right tools and techniques for safety and effectiveness in your repairs.
How Often Should I Check Seams for Damage?
Just like a ship needs regular checks to guarantee its sails are intact, your carpet requires seam inspection to maintain its integrity. You should inspect seams at least twice a year, or more often in high-traffic areas. This proactive carpet maintenance helps catch potential damage early, preventing further issues. If you notice any fraying or gaps, address them promptly to guarantee safety and extend your carpet's life, creating a safe haven in your home.
Can I Use Tape Instead of Adhesive for Seams?
You might wonder if you can use tape instead of adhesive for seams. While tape alternatives can provide a temporary solution, they often lack the seam durability needed for long-lasting results. Adhesives are specifically designed to bond materials securely, ensuring a strong hold. If safety's a concern, it's essential to use products that meet industry standards. For best results, consider sticking with adhesive to maintain the integrity and longevity of the seams.


