To test floors for moisture issues, you should employ methods like the Calcium Chloride Test, Relative Humidity Test, and the Plastic Sheet Method. Each of these follows specific ASTM standards to guarantee accuracy. For example, the Calcium Chloride Test measures moisture vapor emissions, while the Relative Humidity Test involves drilling holes to place probes. The Plastic Sheet Method indicates moisture presence but doesn't quantify it. It's essential to maintain acceptable moisture levels—typically 3.5% to 4.5% for concrete—to prevent flooring damage. Exploring these methods further can enhance your understanding of effective moisture management practices.
Understanding Moisture Issues
Moisture issues in flooring can be a significant concern, particularly in environments where humidity levels fluctuate. It's critical to understand that acceptable moisture levels for concrete floors before installation typically range from 3.5% to 4.5%. Exceeding these levels can lead to excessive moisture vapor, which can cause mold growth and degrade organic materials, especially in tightly sealed areas.
In below-grade concrete locations, the inherent humidity necessitates effective moisture management to prevent flooring installation problems. One effective method for evaluating moisture levels is using a Concrete Moisture Meter in conjunction with RH testing. The Relative Humidity Test, as outlined in ASTM F2170, allows you to accurately gauge moisture conditions throughout the slab depth, ensuring that your readings reflect the true moisture migration within the concrete.
Failure to conduct proper testing can lead to the installation of flooring materials ill-suited for high-moisture environments. Laminate and solid hardwood, for instance, perform poorly when exposed to excessive moisture, while materials like ceramic tile and waterproof luxury vinyl are more resilient. By understanding these moisture dynamics and the importance of testing, you can safeguard your flooring investment and maintain a healthy indoor environment. Ultimately, awareness of moisture issues and adherence to acceptable moisture parameters will empower you to make informed decisions in flooring installation.
Importance of Moisture Testing
Conducting moisture testing is essential for guaranteeing the longevity and reliability of flooring systems. Excess moisture in concrete can lead to significant issues, including mold growth and degradation of flooring materials. By performing concrete moisture tests, you can identify problematic moisture levels before installation, helping you avoid costly repairs down the line.
The acceptable moisture reading for concrete generally falls between 3.5 to 4.5 percent; however, specific flooring manufacturers may provide tailored guidelines regarding allowable moisture content. It's imperative to adhere to these specifications to maintain the integrity of your flooring system. Inadequate moisture control can compromise the structural integrity of a building over time, underscoring the need for proactive moisture management in construction projects.
Utilizing reliable testing methods, such as the Relative Humidity Test (ASTM F2170), guarantees accurate measurement of moisture vapor transmission within the slab. This data is essential for making informed flooring decisions, particularly in environments prone to humidity. Regular moisture assessments not only help you maintain the performance of your flooring systems but also protect your investment in the long run.
Methods for Testing Moisture
When it comes to testing moisture in floors, several methods are available, each with specific equipment and procedures. You can choose from standardized tests like the Calcium Chloride Test and Relative Humidity Test, or simpler methods like the Plastic Sheet Method. Understanding the strengths and limitations of each approach will help you accurately assess moisture levels and prevent flooring issues.
Common Testing Methods
Several reliable methods exist for testing floors for moisture issues, each with its unique approach and level of detail. Understanding these common testing methods is essential for ensuring successful flooring installation and preventing future problems.
- Calcium Chloride Test: This standardized test (ASTM F1869-11) measures the moisture vapor emission rate by placing a calcium chloride disk under a sealed plastic sheet for 24 hours and then weighing it.
- Relative Humidity Test: Following ASTM F2170-11, this method involves drilling holes in the concrete slab and inserting probes at 40% of the slab depth to accurately assess moisture levels.
- Plastic Sheet Method: A simpler approach, it involves taping a plastic sheet to the floor for 24 hours to indicate moisture presence without providing specific moisture readings.
- Moisture Readings: Acceptable moisture readings for concrete typically range from 3.5 to 4.5 percent, though some flooring products can tolerate higher relative humidity levels up to 80-90%.
Proper execution of these testing methods, aligned with ASTM standards, is vital for reliable results and ensuring the longevity of your flooring.
Equipment Needed
To effectively test for moisture issues in flooring, you'll need specific equipment tailored to each method. For the calcium chloride test, acquire a calcium chloride disk and a clear plastic sheet (24×24 inches). After placing the disk beneath the sealed sheet, you'll observe moisture emissions over 24 hours to quantify slabs moisture levels. For relative humidity testing, you'll require a drill to create holes in the concrete, allowing you to insert moisture probes. This method measures moisture at 40% of the slab's depth, offering an extensive assessment of moisture vapor transmission.
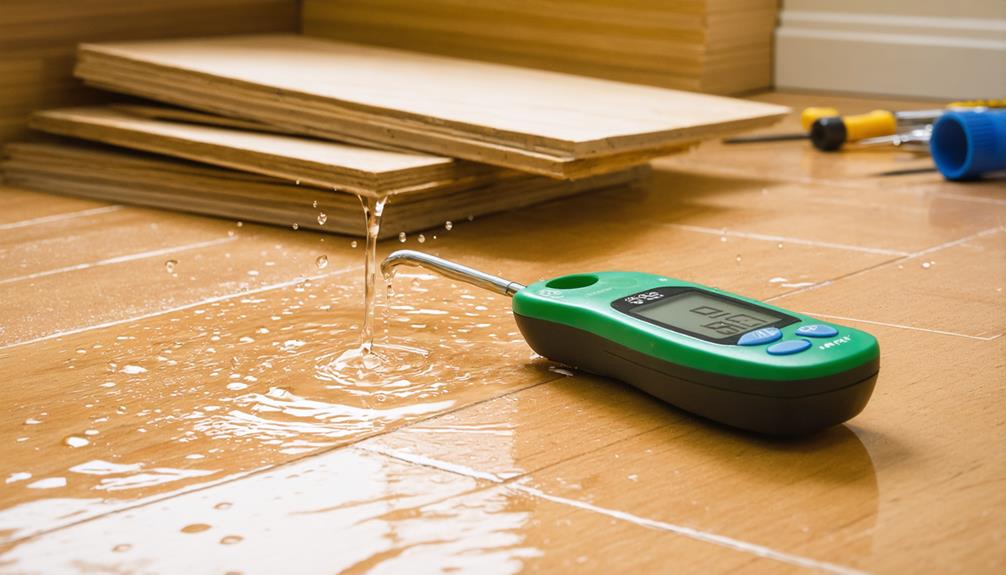
Concrete moisture meters are essential for rapid surface assessments, but keep in mind that they typically don't provide accurate readings beyond one inch. For detailed testing, it's critical to check the pH at each moisture test location. Verify that the pH reading does not exceed 9, as specified by ASTM F710. This equipment will help you gather accurate data to make informed decisions about moisture issues in your flooring. By utilizing these tools, you'll be well-equipped to address any moisture-related concerns effectively.
Testing Procedures
Testing for moisture issues in flooring requires a systematic approach using various established methods. Understanding these testing procedures is essential for accurate assessments before installation. Here's a concise breakdown of the primary methods:
- Calcium Chloride Test (ASTM F1869-11): A calcium chloride disk is placed under a sealed plastic sheet for 24 hours to measure moisture vapor emission, providing quantifiable results.
- Relative Humidity Test (ASTM F2170-11): This method involves drilling holes in concrete slabs to insert humidity probes at 40% of the slab depth, offering a thorough assessment of moisture vapor transmission.
- Plastic Sheet Method (ASTM D4263-05): Tape a plastic sheet to the floor for at least 24 hours to observe moisture presence; however, it doesn't quantify moisture levels.
- Simple Moisture Test: Cut plastic sheeting into squares, secure them over dry concrete areas, and inspect for moisture signs after 48 hours to determine potential issues.
Accurate moisture testing is critical, as flooring manufacturers typically specify allowable moisture levels, generally between 3.5 to 4.5 percent for concrete. Implement these methods to guarantee a sound flooring installation.
The Plastic Sheet Method
When evaluating moisture issues in concrete floors, the Plastic Sheet Method offers a straightforward approach. This method, outlined in ASTM D4263-05, involves taping a 457 x 457-mm (18 x 18 in.) plastic sheet to your concrete floor. By securing the sheet, you can assess moisture presence effectively.
After you've taped the plastic sheet down, it's advisable to wait at least 24 hours before removing it. This waiting period allows for moisture accumulation to occur, if present. Upon removal, inspect the underside of the sheet for any condensation or dampness, as these indicators reveal whether moisture is an issue. However, it's important to highlight that this method does not provide quantitative moisture levels; it simply indicates the presence of moisture.
One limitation of the Plastic Sheet Method is its focus on the upper slab area. It may overlook moisture issues that exist deeper within the concrete. As a result, while this method serves as a simple DIY test, it's vital to complement it with more accurate methods for a thorough assessment. The Calcium Chloride Test or Relative Humidity Test can provide additional insights into moisture conditions.
The Calcium Chloride Test
Building on the insights provided by the Plastic Sheet Method, the Calcium Chloride Test offers a more quantifiable approach to measuring moisture levels in concrete floors. Standardized as ASTM F1869-11, this test measures the moisture vapor emission rate from a concrete slab by placing a calcium chloride disk under a sealed plastic sheet for 24 hours. After this period, you weigh the disk to determine the moisture vapor emitted, providing quantifiable results.
When conducting the Calcium Chloride Test, consider the following key points:
- Testing Procedure: Place the disk on the slab, cover it with a plastic sheet, and let it sit for 24 hours.
- Weight Measurement: After the testing period, weigh the disk to find the weight difference, which indicates the moisture vapor emission.
- Acceptable Rates: A typical acceptable moisture emission rate for many flooring materials is 3 lbs or less per 1,000 square feet over 24 hours.
- Limitations: While effective for evaluating shallow moisture levels, this test does not account for moisture deeper within the concrete slab and is considered less reliable compared to in-situ relative humidity testing.
Understanding the Calcium Chloride Test is essential for ensuring that your flooring materials will perform effectively in relation to the existing moisture conditions, thereby avoiding potential issues down the line.
Relative Humidity Testing
For accurate assessment of moisture levels within concrete slabs, relative humidity (RH) testing is invaluable. This method employs in-situ probes drilled into the concrete to a depth of 40% of the slab thickness, aligning with ASTM F2170 standards. By allowing the probes to remain in place for at least 24 hours, you facilitate moisture equilibration, ensuring that the moisture readings you obtain truly reflect the conditions within the slab.
RH testing is regarded as the most reliable approach for evaluating moisture vapor transmission (MVT) in concrete. Unlike surface tests, it measures the moisture conditions throughout the slab, providing a more thorough understanding of concrete moisture. Acceptable moisture levels for concrete installation typically fall below 75% RH; however, some flooring products can tolerate up to 80-90% RH based on manufacturer guidelines.
The Rapid RH system enhances the RH testing process by using factory-calibrated probes, which streamline data collection and analysis. This system helps you maintain compliance with moisture management requirements, ultimately safeguarding your flooring investments. By accurately testing concrete moisture levels, you can make informed decisions and mitigate potential issues related to excess moisture. Adhering to accepted practices in RH testing is essential for ensuring that your concrete slab is suitable for flooring installation and that you're not risking future complications.
Conducting a Simple Moisture Test
A simple moisture test can serve as an effective preliminary assessment of moisture presence in concrete slabs. By following a straightforward process, you can identify potential moisture issues before they escalate. Here's how to conduct this test:
- Cut Plastic Sheeting: Prepare clear plastic sheeting into 24-by-24-inch squares, ensuring they're free from holes.
- Secure the Sheets: Use duct tape to affix the plastic sheeting over dry areas of the concrete slab, eliminating air circulation.
- Wait and Observe: Allow the sheets to remain in place for at least 48 hours. This duration is vital for accurate results.
- Inspect for Moisture: After 48 hours, check for signs of moisture presence. Look for beads of water on the surface or dampness on the underside of the plastic.
If you detect moisture, it indicates potential moisture issues in the concrete slab that may require further investigation or advanced testing methods. Remember, this basic moisture test provides a preliminary indication of moisture presence but doesn't quantify moisture levels. If the test reveals moisture, consider following up with more precise methods for accurate results. Conducting a simple moisture test is an essential first step in managing moisture issues effectively, offering you the freedom to make informed decisions about your flooring and its long-term durability.
Evaluating Flooring Options
When you're evaluating flooring options for moisture-prone areas, it's essential to take into account the material's moisture resistance ratings. Options like ceramic tile, waterproof luxury vinyl, and rubber tile are engineered to withstand higher moisture levels, while materials such as laminate and solid hardwood can lead to severe damage. Always verify the chosen flooring meets the acceptable moisture readings to maintain integrity and prevent future issues.
Flooring Material Considerations
Selecting the right flooring material is fundamental in moisture-prone areas, as it directly impacts durability and performance. When considering your options, it's essential to prioritize materials that resist moisture effectively. Here are some key flooring material considerations:
- Moisture-Resistant Options: Choose ceramic tile, waterproof luxury vinyl, or rubber tile, as they perform well against moisture issues.
- Acceptable Moisture Readings: Verify concrete slabs have moisture content between 3.5 to 4.5 percent. Manufacturers often specify allowable moisture content for installing flooring.
- Acclimation of Wood Flooring: If opting for wood flooring, allow it to acclimate for days to weeks. This process is critical to reach target moisture content, affecting performance and longevity.
- Vapor Barriers: In below-grade locations, consider installing vapor barriers to mitigate high humidity levels. This will help reduce potential damage from moisture infiltration.
Moisture Resistance Ratings
Moisture resistance ratings play an essential role in evaluating flooring options, especially in environments prone to dampness. When selecting flooring materials, you'll want to take into account how they perform under varying relative humidity (RH) conditions, particularly over concrete floors.
| Flooring Material | Moisture Resistance Rating |
|---|---|
| Ceramic Tile | High |
| Waterproof Luxury Vinyl | High |
| Rubber Tile | High |
| Laminate | Low |
| Solid Hardwood | Low |
| Carpet | Low |
Many manufacturers provide specific moisture resistance ratings, indicating acceptable moisture levels for installation—typically requiring readings below 3.5 to 4.5 percent moisture content in concrete. In high humidity areas or below-grade installations, understanding these ratings is vital for long-term performance. While some flooring products are naturally moisture-resistant, others may need moisture barriers or seals to prevent damage.
Best Practices for Moisture Management
Effective moisture management is vital for maintaining the integrity of flooring systems, especially in environments prone to humidity fluctuations. To achieve ideal moisture control, you should adopt the following best practices:
- Conduct Regular Moisture Testing: Utilize in situ relative humidity (RH) testing methods, as per ASTM F2170, to measure moisture levels within the concrete slab at 40% of its total depth. This guarantees accurate assessments of the slab's moisture content.
- Maintain Environmental Conditions: Keep the job site temperature between 60-80°F and relative humidity (RH) levels between 30-50%. Fluctuations in these environmental conditions can greatly impact moisture readings and the overall performance of the flooring.
- Implement Moisture Mitigation Strategies: Use vapor barriers and proper drainage systems, particularly in below-grade installations where moisture levels tend to be elevated. These strategies are essential in preventing moisture ingress.
- Monitor HVAC Systems: Regularly check and maintain your HVAC systems during and after flooring installation. This will help control humidity levels, reducing the risk of excess moisture accumulation that may damage your flooring materials.
Additionally, don't forget to document all moisture testing results and environmental conditions. This documentation not only guarantees compliance with manufacturer guidelines and local building codes but also reduces potential disputes related to flooring failures. By following these practices, you'll foster a proactive approach to moisture management, ultimately preserving your flooring investment.
Frequently Asked Questions
How Do You Check for Moisture Under Flooring?
To check for moisture under flooring, you can use various moisture detection methods. Start with a moisture meter for quick readings. Consider common moisture sources like leaks or humidity. For thoroughness, conduct a subfloor inspection using humidity control techniques, making certain it's dry. Implement prevention strategies, such as proper ventilation. If you're uncertain, a professional assessment option might be necessary to guarantee flooring material impacts aren't overlooked, safeguarding your investment against potential damage.
How Do You Test for Damp Flooring?
When it comes to testing for damp flooring, it's essential to know that a stitch in time saves nine. Start with damp detection methods like the Plastic Sheet Method or the Calcium Chloride Test. Use moisture measurement tools to identify signs of dampness. Consider common moisture sources and flooring material considerations. Employ humidity control techniques and preventive maintenance strategies for effective flooring inspection tips. Being proactive can save you from bigger headaches down the road.
How Do You Check for Moisture Under Tile Floor?
To check for moisture under your tile floor, start with tile inspection techniques like using a moisture meter. This'll give you insights into any hidden issues. Next, assess your subfloor by examining grout condition for cracks or discoloration, which can indicate water damage signs. Don't overlook environmental humidity control; high levels can worsen moisture problems. If needed, consider professional testing services for accurate readings, especially with varying flooring material considerations.
How Do You Fix Moisture in the Floor?
Fixing moisture in the floor's like patching a leaky boat—if you don't address it, it'll sink. Start by applying moisture barriers to your flooring materials to block vapor. Use dehumidification methods and improve ventilation solutions to lower humidity. For severe cases, consider flooring repairs and consult a professional for advanced moisture detection and long-term prevention strategies. Addressing these issues promptly can help you avoid extensive water damage and costly repairs down the line.


