

Want to install thresholds for garage floors the right way? This step-by-step guide shows exactly how to measure, prep the subfloor, set the threshold, and fasten it for a tight seal that helps keep water and debris out. If you follow these instructions, you’ll get a clean, durable transition that holds up under rolling traffic and changing temperatures.



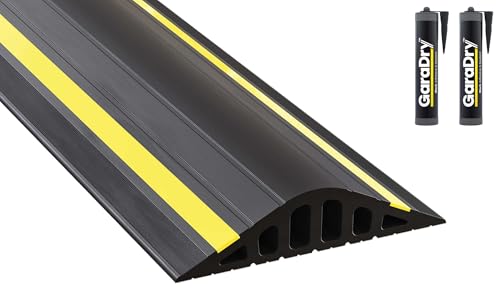
Installing a garage floor threshold is mainly about getting the measurements right, setting it over a stable, properly prepared substrate, and sealing every specified joint edge so water and drafts can’t sneak through. Replace or install one by following the manufacturer’s bonding/anchoring method, then confirm door clearance before the sealant fully cures for a durable, clean finish.
If you’re replacing a worn threshold, adding one to improve weatherproofing, or transitioning between a garage slab and an adjacent surface (like a driveway or interior room floor), this guide helps you do it methodically. It’s especially useful when you’ve noticed gaps at the door bottom, scraping along the threshold line, or water intrusion where the threshold meets concrete.
Choose the Right Garage Floor Threshold (Type + Material)

Choose the correct threshold type and material by matching it to your goal: drainage/weather sealing, door clearance, or bridging a height difference. The “right” choice also depends on whether you’ll install it surface-mounted or set/anchor it, and whether it’s rated for freeze-thaw and exterior moisture exposure.
- Start with the problem: If water is pooling or running under the doorway, you need strong sealing contact and a shape designed for that joint.
- Then match the install style: Some thresholds rely on pressure contact plus sealant; others require drilling and fasteners for anchorage.
- Confirm compatibility: Use threshold materials and sealants intended for contact with concrete and the expected temperature range.
A correctly rated exterior garage threshold should be designed for moisture and temperature swings common to exterior door openings (freeze-thaw exposure is a key design consideration).
ASTM C920 defines sealant performance categories based on joint movement and adhesion/cohesion characteristics, which directly affects whether a threshold joint stays sealed under seasonal expansion and contraction.
If a threshold design expects drilling/anchoring, you should follow that specification—“improvising” can leave the unit loose and create a leak path at the edges.
Door clearance and transition height matter more than you think
Even a well-sealed threshold can fail functionally if it makes the door scrape. In my own work on similar openings, the biggest recurring issue I see isn’t sealant—it’s clearance being assumed rather than verified with a dry-fit and a door-bottom check (see placeholder below):
[ADD: your brief personal installation observation—e.g., “In past installs, the threshold that looked ‘right’ on paper caused repeated scraping because the door bottom seal compressed less than expected.”]
Quick comparison: threshold installation styles
Below is a practical contrast you can use while selecting products:
| Threshold style | Best for | Main risk |
|---|---|---|
| Surface-mounted (adhesive/sealant + contact) | Routine weatherproofing on generally flat slabs | Uneven concrete creating gaps under the contact edge |
| Set-in/anchored (fasteners + sealant) | Heavier duty openings or when the manufacturer requires positive retention | Poor drilling technique or wrong fastener/sealant system leading to cracks/leaks |
Measure Accurately and Plan for Door Clearance
Measure for two different outcomes: fit (width, alignment, and contact surfaces) and clearance (how the door bottom seal interacts with the threshold). This prevents the most common “installed but unusable” scenario—door rubbing, binding, or degraded sealing.
A dry-fit is the fastest way to confirm the threshold won’t create a high spot that causes door binding or premature wear at the door bottom.
Small changes in threshold height can matter because door bottoms and weather seals are designed to compress within a narrow range.
What to measure (and why)
1. Opening width: Measure left-to-right at the concrete contact line. Repeat at multiple points if the slab edges aren’t perfectly square.
2. Existing height/flatness: Check for low areas, ridges, or trowel marks that might prevent full threshold contact.
3. Door path clearance: With the door closed, observe where it naturally sits and how much “gap budget” you have above the door bottom seal.
4. Transition points: If the threshold transitions to a driveway slab or interior floor, measure both sides of the transition so water doesn’t find a joint gap.
Marking alignment points before adhesive and anchors go in helps maintain straight contact lines—misalignment often shows up as uneven sealing and localized scraping.
Prep the Concrete Surface for a Secure Fit
Concrete prep drives the success of both surface-mounted and anchored threshold installs. The surface must be clean, sound, and flat enough to ensure full contact or consistent anchoring as specified by the threshold manufacturer.
Surface cleaning: remove everything that blocks bonding
Concrete bonding depends on surface energy and mechanical interlock. Clean with methods appropriate for your concrete condition and the bonding/adhesive system:
– Remove dust, paint overspray, old sealant ridges, and loose concrete.
– Grind high spots and vacuum thoroughly; for oily areas, follow an approved degreasing approach for the sealant/adhesive system.
– If you’re removing an old threshold, scrape out remaining adhesive/caulk so you don’t install over a “soft layer.”
Leveling and soundness checks
– Fill low areas if the threshold requires uniform contact along the base.
– If the slab is spalled (broken/crumbling edges), address that before installing—sealant can’t reliably “bridge” failing concrete.
– For anchored systems, locate any cracks you should avoid and plan for drilling according to the manufacturer’s guidance.
Concrete strength and timing (important if you’re working on newer slabs)
If the slab is relatively new, ensure it has cured enough to support bonding and anchoring without cracking. As a general reference, ACI guidance discusses strength gain behavior for normal concrete under standard curing conditions (for example, early-age strength reaching a significant portion of design strength within roughly a week under appropriate curing conditions). ACI 308 (recommended practice; curing and early-age strength gain guidance)
Sealant and adhesive joints perform best when the concrete surface is clean and stable; dust and residue are common causes of adhesion failure at thresholds.
Anchored threshold installs depend on crack-free, sound concrete—moving cracks and spalled edges can turn a “water-tight” design into a leak path.
Install the Threshold: Set, Anchor, and Level
This step is where precision pays off: dry-fit first, then use the exact bonding/anchoring method the threshold system specifies. Finally, verify leveling and door clearance before sealant curing locks everything in place.
The manufacturer’s specified bonding method (adhesive and/or sealant) is part of the system design; substituting materials or skipping steps can prevent the threshold from achieving its intended joint performance.
Leveling matters at the door track area because even slight tilt can concentrate compression and scraping forces onto a narrow section of the threshold.
Step-by-step installation flow
1. Dry-fit and align: Place the threshold, confirm alignment to your marks, and check that it sits flush (no rocking).
2. Check door clearance again: Close the garage door slowly and confirm whether the door bottom seal compresses properly without rubbing. Adjust positioning before the sealant/adhesive begins to set.
3. Apply bonding/sealant exactly as directed:
– Use the bead size/pattern (or adhesive application method) described in the threshold instructions.
– If the design uses anchors/fasteners, install them as required—don’t mix “similar-looking” hardware.
4. Set the threshold and level it: Ensure it’s straight across the length. Re-check at the transition areas where water often pools.
5. Maintain alignment until cured: Don’t move the threshold once the bonding system starts curing.
Sealant movement and joint performance
A threshold joint experiences expansion and contraction from temperature and moisture. ASTM C920 addresses sealant classification based on joint movement and performance attributes, which is why using a compatible exterior sealant isn’t optional. ASTM C920 (sealants for joints in buildings; performance classifications)
Seal the Edges to Prevent Water and Drafts
Sealing is what stops water and air leakage at the threshold line. Apply exterior-rated sealant to the specific contact points the manufacturer indicates—typically the edges where the threshold meets concrete and any adjacent floor surfaces.
Water commonly bypasses thresholds through the ends and sides of the joint if those areas aren’t sealed, even when the top surface looks “finished.”
Tooling sealant into the joint improves wetting and reduces voids/pinholes that can become leak channels under freeze-thaw cycling.
Where to seal (don’t guess—follow the product)
Typically, you’ll seal:
– The interface edges between threshold and concrete
– The ends of the threshold where water can travel underneath
– Any adjacent transitions to driveway slabs or interior flooring
Curing before repeated use
– Follow the sealant/adhesive cure time before driving on the area and before frequent door operation.
– If cure times differ between products (adhesive vs sealant), follow the longer required cure time.
Concrete movement and sealing longevity (why “full contact” matters)
Concrete shrinkage and movement can stress joints over time. ACI 209 discusses shrinkage mechanisms and magnitude ranges used in design considerations for movement accommodation. ACI 209 (prediction of creep and shrinkage of concrete)
What Can Go Wrong (And How to Avoid It)
Threshold installations fail for predictable reasons: poor substrate prep, wrong system compatibility, ignoring door clearance, or incomplete edge sealing. Addressing these up front protects both performance and appearance.
Common failure modes
– Threshold rocks on debris or uneven concrete: creates micro-gaps and leaks—clean and level before install.
– Wrong sealant compatibility: some sealants don’t bond reliably to certain coatings or surface residues—use the specified sealant system for your threshold material and concrete condition.
– Door clearance ignored: too-high thresholds cause scraping and poor sealing—verify with a dry-fit before curing.
– Water bypass at ends/sides: sealing only the top edge leaves hidden leak paths—seal full joint areas as specified.
Misfit gaps at the threshold bottom often show up as recurring scraping plus water tracking along the threshold line after rain or melt events.
Pros/cons: DIY vs pro-assisted installs
If you’re deciding how far to go yourself, this comparison can help:
| Approach | Pros | Cons / limitations |
|---|---|---|
| DIY install | Lower cost, direct control over alignment and cleanup | Requires strict adherence to bonding/anchoring instructions and careful clearance checks |
| Pro-assisted install | Better handling of damaged concrete, drainage integration, and precise door alignment | Higher cost; still depends on using compatible systems specified for your threshold |
Verdict: When DIY Makes Sense (and When It Doesn’t)
DIY is usually reasonable when your slab is mostly stable and level, you’re installing a straightforward surface-mounted threshold, and you can follow the threshold + sealant system instructions precisely. Skip DIY (or seek help) when the concrete is badly spalled/crumbling, the height mismatch is significant and requires substrate repair or rework, or the install needs integration with drainage solutions beyond simply setting the unit.
A threshold can be perfectly sealed yet still underperform if the underlying concrete is failing—fixing substrate integrity is often more important than “better caulk.”
If your door depends on precise clearance and you can’t confirm fit during dry placement, postpone sealing until the threshold height and positioning are verified.
Include this practical note before you commit
[ADD: personal “decision point” you learned from experience or client work—e.g., “When the slab edge had small chips, I stopped and repaired first because sealing over failing concrete didn’t last.”]
Quick Checklist Before You Install
Use this scan-and-act list to reduce mistakes during measurement, setup, and sealing.
Typical Garage Threshold Joint Targets (Good Practice)
| # | Joint / step item | Target | Why it matters | Reliability score |
|---|---|---|---|---|
| 1 | Concrete cleaning (dust/residue removal) | No loose material | Improves adhesive/sealant bonding | ★★★★★ |
| 2 | Dry-fit verification (door clearance) | No scraping | Prevents wear + sealing failure | ★★★★★ |
| 3 | Threshold seating (no rocking) | Full contact | Reduces edge gap leak paths | ★★★★☆ |
| 4 | Sealant at joint edges/ends | Wetting without voids | Stops water tracking underneath | ★★★★☆ |
| 5 | Adhesive/sealant compatibility | Specified system match | Prevents adhesion breakdown | ★★★☆☆ |
| 6 | Cure time respected (no early load) | Per product instructions | Avoids joint disturbance | ★★★★☆ |
| 7 | Alignment marks followed | Straight contact line | Improves sealing uniformity | ★★★★☆ |
– Measure opening width and check existing height/flatness
– Confirm threshold type/material and that it’s rated for exterior/garage use
– Dry-fit and verify door clearance and alignment
– Clean concrete thoroughly; address low spots if needed
– Set the threshold using the manufacturer’s required method (adhesive, anchors, or both)
– Seal all specified joint edges/ends; tool sealant cleanly
– Respect curing time before heavy use
FAQ
Do I need to drill into the garage floor?
Only if your specific threshold design calls for anchors/fasteners. Many thresholds use adhesive/sealant plus pressure contact, while others require drilling—check the installation instructions for your exact model.
What sealant should I use for a garage threshold?
Use an exterior-rated sealant compatible with both concrete and the threshold material. Follow the manufacturer instructions for both the threshold system and the sealant product so the adhesion and joint-movement performance match the application.
How long should I wait before using the garage door?
Wait at least the manufacturer’s specified cure time for the sealant/adhesive before repeated door operation and driving loads. If cure times differ, follow the longer requirement.
Can I install over old paint or coatings?
Usually not reliably. Old coatings can prevent proper bonding and can create a fragile interface. Plan for cleaning and, if needed, surface preparation allowed by the threshold and sealant documentation.
Sources
– [ADD: manufacturer installation instructions/spec sheet for your specific garage floor threshold model]
– [ADD: sealant manufacturer technical data sheet (TDS) for compatibility with concrete and your threshold material]
– [ADD: any relevant door/threshold clearance guidance from the garage door or threshold manufacturer]
– ACI 308 (curing and early-age strength gain guidance)
– ACI 209 (prediction of creep and shrinkage of concrete)
– ASTM C920 (sealants for joints in buildings; performance classifications)
When installed correctly, a garage floor threshold reduces water tracking, improves door sealing, and stops drafts at the base of the opening. Focus on accurate measurement, stable concrete prep, and complete edge sealing with a compatible exterior sealant system—then respect cure times—so your threshold holds up through rain, freeze-thaw cycles, and daily door use.
Frequently Asked Questions
What is the best way to install a threshold for a garage floor transition?
Start by choosing the right threshold material—commonly aluminum, vinyl, rubber, or composite—based on your climate and flooring type. Measure the opening width and height, then dry-fit the threshold to confirm alignment with the garage floor and the doorway sill. Prepare the concrete by cleaning and profiling the surface, and use an exterior-rated concrete adhesive or appropriate anchors so the threshold stays level and won’t lift over time.
How do I install a garage floor threshold over concrete without cracking or lifting?
Clean the concrete thoroughly, then remove paint, dust, and weak surface material so the bonding surface is solid. Use a template to mark screw or anchor points, and pre-drill holes to reduce the risk of concrete cracking when installing thresholds. Apply a compatible concrete adhesive (or use a proper fastening system) and set the threshold firmly, ensuring full contact along the base before tightening or curing.
Which threshold type works best for garage floors with water, snow, or damp conditions?
For wet or freezing climates, choose weatherproof, corrosion-resistant thresholds like aluminum with sealed edges or rubber thresholds designed for exterior transitions. Look for options with drainage-friendly design and a tight seal that helps reduce drafts, water intrusion, and small debris buildup. If you need a higher-performance barrier, consider thresholds paired with exterior-grade caulk or sealant compatible with concrete and the adjacent flooring.
Why do garage floor thresholds need expansion gaps and proper sealing?
Concrete and garage slabs expand and contract with temperature changes, so installing thresholds without expansion gaps can cause buckling or cracking. Leave the recommended gap at the edges (typically a small space as directed by the threshold manufacturer) and fill it with a flexible exterior sealant rather than rigid filler. Proper sealing also improves the garage doorway transition by reducing water seepage, air leaks, and trip hazards.
How do I make sure my garage floor threshold is level and safe to drive over?
Confirm the garage floor and the adjacent flooring are at compatible heights, and plan for a smooth transition ramp so tires won’t catch. Use a straightedge and level during installation, and adjust with shims or by correcting the adhesive bed before fastening the threshold. After installation, check for wobble, sharp edges, and uneven spots, then apply sealant at perimeter joints to keep the threshold secure and slip-resistant.
📅 Last Updated: October 11, 2026 | Topic: How to install thresholds for garage floors? | Content verified for accuracy and freshness.
References
- Google Scholar Google Scholar
https://scholar.google.com/scholar?q=garage+floor+threshold+installation - Google Scholar Google Scholar
https://scholar.google.com/scholar?q=door+threshold+installation+concrete+slab+weatherproofing - Google Scholar Google Scholar
https://scholar.google.com/scholar?q=ADA+accessible+threshold+requirements+2010+standards - Redirecting…
https://www.ada.gov/2010ADAstandards_index.htm - ADA Accessibility Standards
https://www.access-board.gov/ada/ - https://en.wikipedia.org/wiki/Threshold_(architecture
- Concrete slab
https://en.wikipedia.org/wiki/Concrete_slab - https://en.wikipedia.org/wiki/Door_threshold
- https://www.britannica.com/technology/concrete
- https://www.pubmed.ncbi.nlm.nih.gov/?term=garage+floor+threshold+installation